

Did you know that most burglaries happen through the front door and many locks fail due to poor installation? As smart home tech grows, securing your entry point with a smart lock isn’t just convenient, it’s essential.
That’s why learning how to install a smart lock correctly is more important than ever for your home’s safety and convenience.
To install a smart lock, start by removing the existing lock. Next, mount the new components carefully, align the deadbolt, connect the interior unit, and insert the batteries. But things do not end here; you need to pair the lock properly with your smartphone.
At Kingdom Locksmith, we specialise in smart lock installations, repairs, and high-security upgrades for homes and businesses across multiple cities. We’re trusted for quality, reliability, and fair pricing.
Keep reading and take control of your door’s security today with confidence.
How To Install Smart Lock: Step-by-Step Guide For A Secure Upgrade
Step 1: Select The Right Door Lock
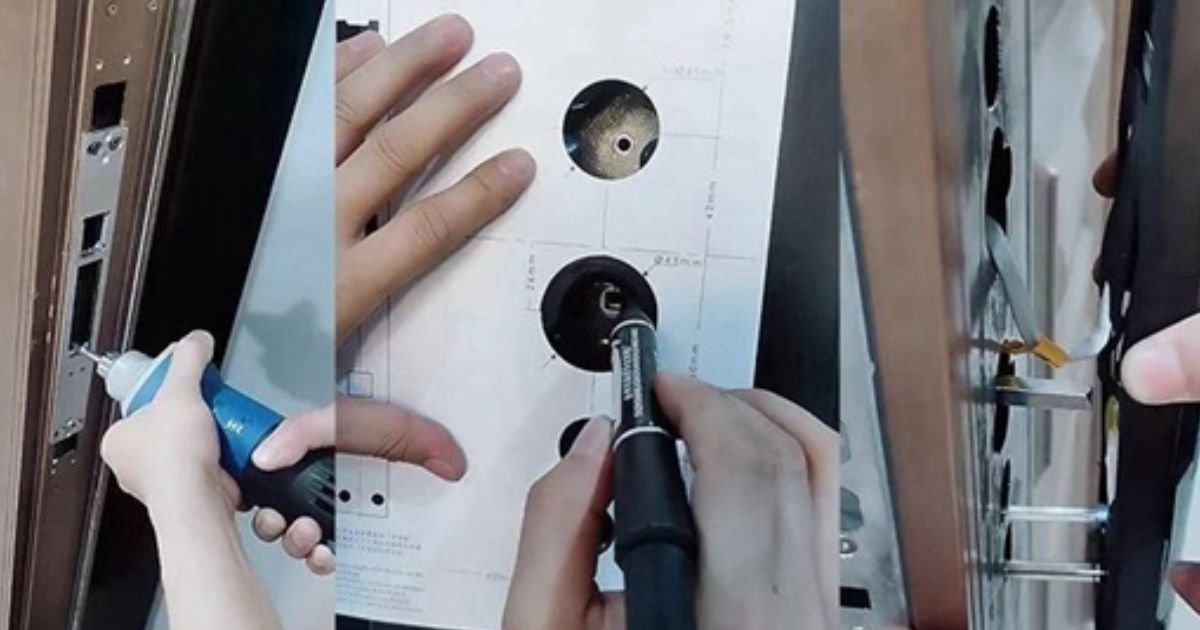
Start by checking your door’s compatibility. Most smart locks fit standard doors with a deadbolt and a 2-1/8″ borehole. Now, explore lock types like keypad, fingerprint, Wi-Fi, or Bluetooth. Choose based on your daily use.
Do you want remote control or local access only? Some models work with voice assistants, and others use mobile apps with code sharing. Look at brands offering strong encryption and tamper alerts.
Prioritise locks with battery backup and manual key override. Pick a lock that matches both your needs and door hardware.
Step 2: Gather The Needed Tools
Before starting, get all tools ready. This keeps your work smooth and avoids mistakes during installation. Below is a quick reference list:
| Tool | Use |
| Phillips Screwdriver | For removing and attaching screws on both interior and exterior parts. |
| Flathead Screwdriver | Helps pry off faceplates or covers without scratching surfaces. |
| Measuring Tape | Used to check door thickness and backset alignment. |
| Drill (if required) | Needed only if new holes must be created or adjusted. |
| Level Tool | Ensures the lock sits straight on the door surface. |
| Pencil or Marker | For marking screw points or alignment before securing hardware. |
| Smart Lock Manual | Use for model-specific steps and installation diagrams. |
| Smartphone | Required for app setup, pairing, and initial configuration. |
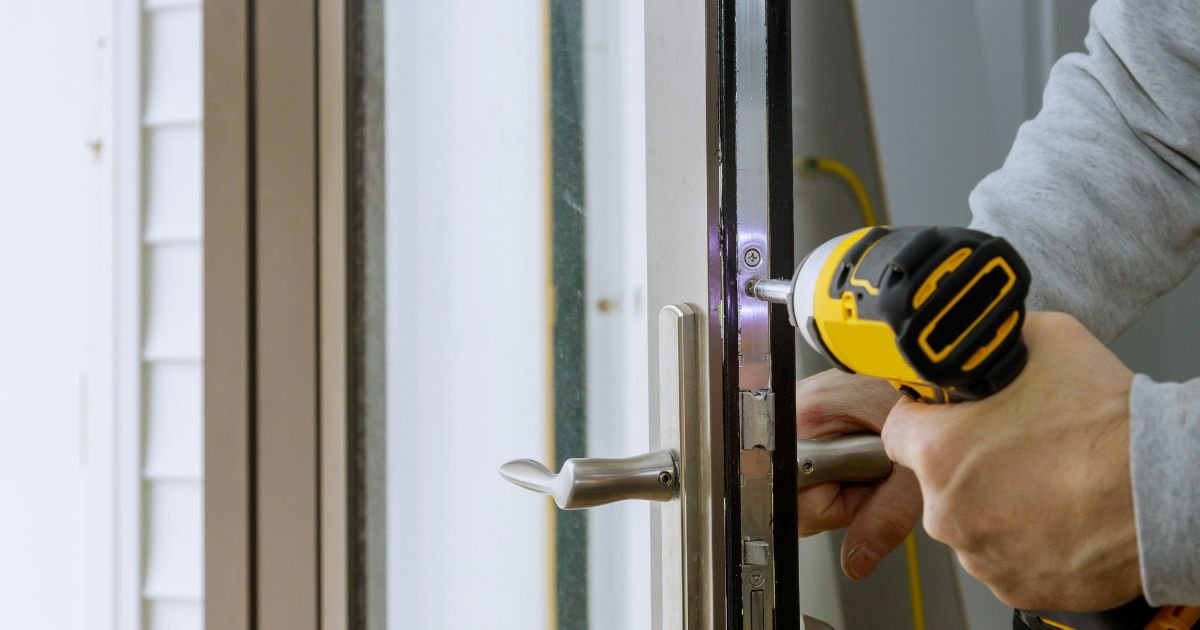
Step 3: Disassemble The Old Lock
Begin from the inside of the door. For better control, remove the mounting screws using a manual Phillips screwdriver.
Once loose, pull off the interior and exterior assemblies without tilting. This prevents damaging the door surface. Next, move to the latch. Unscrew it from the door edge and slide it out carefully. If there’s a faceplate, use a flathead to lift it without bending the metal.
Inspect the borehole for cracks, splinters, or old screw damage. Before proceeding, clean the area and confirm that the opening matches your smart lock’s backset and diameter.
Step 4: Set Up Power Source
Most smart locks run on AA or CR123 batteries. Open the battery compartment, usually located on the interior unit. Insert batteries in the correct polarity, and check the markings carefully. Never mix old and new batteries.
If your lock uses a rechargeable pack, fully charge it before installation. Some models activate when power is connected, so don’t force any buttons. After inserting the power, close the compartment securely. Now, your smart lock is ready for mounting and configuration.
Step 5: Install The Smart Lock Components
Now that the door is ready and power is set, it’s time to install each component with precision. Here’s what you’ll work with and how to mount them:
- Deadbolt Latch
Insert the latch into the edge borehole, align it with the center of the main hole, and fasten it with two screws. - Exterior Unit (Keypad or Reader)
Push the tailpiece through the latch slot. Hold it flush against the door. Don’t tilt, it must sit evenly. - Mounting Plate (Interior Side)
Align it with the holes and attach using long screws. Keep the exterior unit steady while tightening to prevent misalignment. - Interior Unit (Battery Housing and Motor)
Slide it onto the mounting plate carefully. Make sure the tailpiece fits into the internal gear slot before tightening screws. - Connector Cable (If Present)
Plug it into the interior unit before final assembly. Avoid bending or twisting the cable sharply.
Step 6: Connect Smart Lock To Devices
Once the lock is mounted, it’s time to sync it with your phone. This step gives you complete access control and remote features. Most smart locks connect through a mobile app using Bluetooth, Wi-Fi, or both. Follow the instructions below to set it up correctly:
- Download the App
Go to the App Store or Google Play. Search for your smart lock’s official app and install it on your smartphone. - Create or Log In to an Account
Open the app and sign in or create a new account. Use a secure password for better access control. - Start Device Pairing
Select “Add Device” or something similar in the app. Keep your phone near the lock and turn on Bluetooth or Wi-Fi as needed. - Scan the QR Code (If Required)
Some locks include a QR code inside the battery compartment or packaging. Scan it when prompted to speed up pairing. - Customize Settings
Name your lock and adjust features like auto-lock time, guest access, or notifications. If supported, set up passcodes or fingerprint users. - Test Basic Functions
Lock and unlock using your phone. Make sure the app responds in real time and the bolt moves smoothly each time.
Step 7: Configure Customised Settings
After pairing, you should now fine-tune your smart lock’s behaviour. Open the app and locate the settings menu. Set auto-lock delay based on your routine, typically 30 seconds to 1 minute. Add trusted users by sharing access codes or app invitations. If supported, activate geofencing for hands-free locking when you leave.
Also, review alert preferences and enable real-time lock/unlock notifications. Some models let you create temporary codes for guests or schedule access by time or day. These adjustments improve both usability and security without needing physical keys.
Step 8: Test The Smart Lock
Now test your Smart lock installation like a technician would. Start by manually locking and unlocking from both sides of the door. Then use the app to trigger the lock remotely. Watch the bolt, it should extend and retract fully without stalling.
If installed, try any keypad or fingerprint access. Listen for a smooth motor sound. Close the door and check if the latch enters the strike plate without friction.
Finally, a power failure can be simulated, and backup access options can be tested. Proper testing confirms long-term reliability and precise alignment.
Troubleshooting Common Smart Lock Installation Issues
Even when you follow every step, smart locks can still cause unexpected problems. Don’t worry, you’re not alone. Below are real issues that pros deal with and how you can fix them.
Lock Doesn’t Auto-Lock After Closing
If your lock doesn’t auto-lock, first check the door sensor. It might be slightly off or not detected by the system. Go into the app settings and recheck your auto-lock timing.
Also, clean the sensor area, as dust or misalignment often interrupts the signal. You want the door to close and line up before the timer starts fully.
Bolt Binds or Jams Midway
You turn the lock, and it sticks halfway. This usually means the deadbolt isn’t aligned with the strike plate. Close the door and watch if the bolt rubs or misses the opening.
If it does, adjust the strike plate by loosening the screws and shifting slightly. A tight door frame can also be the issue, especially in humid conditions.
Interior Unit Doesn’t Sit Flush
The interior unit should sit flat against the door. If it bulges or tilts, the mounting plate might be off-centre or over-tightened.
Back off the screws just a bit, realign the plate using a level, then retighten slowly. If cables are caught between parts, reroute them properly. A flush interior is key to smooth motor function.
Wi-Fi or Bluetooth Keeps Dropping
You try unlocking your phone, but it shows disconnected. This usually happens when the signal is blocked, often by a metal door or thick walls.
Try moving your router closer to the door. For Bluetooth-only models, stay within 10 feet. If your lock supports a smart hub, consider using it. A stable signal is critical for remote access.
Keypad Doesn’t Respond to Touch
You press the keypad, but nothing happens. Cold weather or a low battery can make it unresponsive. If it’s freezing outside, warm the surface gently by hand. Open the back panel and swap in fresh batteries.
Do not use rechargeable batteries unless the brand supports them. Always test the screen after battery changes to confirm it’s back online.
App Shows Lock as Offline
If your lock shows offline in the app, the pairing might’ve failed during setup. Open the app, delete the lock profile, and reset the lock manually.
Follow the app instructions to pair again. While doing so, check for firmware updates. Reconnect only after your phone has a strong Wi-Fi or Bluetooth connection nearby. A clean setup often solves this.
Expert Maintenance Tips To Keep The Smart Lock At Its Best
Smart locks need more than batteries, and they need regular checkups. Below are real technician-approved habits to keep yours working without failure.
- Check mounting screws every 3 months to avoid internal misalignment from daily door movement.
- Replace batteries every 6–8 months, even if not dead, to prevent sudden power loss.
- Clean the keypad surface weekly using a microfiber cloth to avoid buildup that affects touch sensitivity.
- Review user access logs monthly to catch unauthorised attempts or unusual entry times.
- Recalibrate auto-lock settings seasonally as door expansion affects bolt alignment.
- Inspect the strike plate twice yearly for shifting or wear from heavy use.
- Run firmware updates quarterly to patch bugs or improve response time.
- Test backup access methods monthly, like key override or app control, to catch issues before you need them.
DIY Vs. Professional Smart Lock Installation
Installing a smart lock may seem simple, but not every situation is DIY-friendly. Let’s break down the actual differences so you can choose wisely.
DIY Installation
- Cost Range: Usually £0–£30 if you already own tools; you just need batteries and mounting materials specific to your smart lock.
- Best for: Installing basic smart deadbolts on standard wood doors with clean, single-cylinder holes and pre-drilled latch positions.
- What You Need: Correct door measurements, a compatible smart lock model, mounting plate alignment skills, and time to pair devices through the app.
- Risk Factor: Improper alignment can cause auto-lock failure, keypad misreadings, or motor burnout. One wrong wire or bolt ruins the locking cycle.
- Pro Tip: Always test the locking and unlocking action with the door open before final mounting to avoid damaging internal electronics.
Professional Installation
- The Cost Range: £80–£200+, depending on the smart lock model, door material, and any electrical integration, such as Wi-Fi bridges or hubs.
- Best for: Complex smart locks with biometric features, metal or reinforced doors, double-bore systems, or any new installation requiring precision.
- What You Get: Clean mounting, correct latch depth, motor gear alignment, and app pairing handled by someone with hands-on product experience.
- Added Value: Technicians inspect battery terminals, wiring paths, and strike plate tension, often skipped during DIY, but critical for digital lock accuracy.
- Pro Tip: Ask your installer to run a full app walkthrough and set emergency access options like backup keys, codes, or external power ports.
In Closing
Installing a smart lock is a valuable upgrade that enhances convenience and door security. From choosing the right model to configuring advanced features, every detail plays a role in long-term reliability.
Whether you’re setting it up on a front door, a rental property, or a business entry, a properly installed smart lock gives you more control over access and peace of mind.
If your setup involves custom doors, complex features, or simply feels overwhelming, trust the experts at Kingdom Locksmith. We deliver fast, precise, smart lock installations you can depend on. Reach out today and secure your entry professionally.
Frequently Asked Questions
Question: Can I install a smart lock without removing my existing deadbolt?
Answer: Some models are designed to fit over your current deadbolt from the inside. However, full-featured smart locks require complete removal for proper fit and function.
Question: Will a smart lock work if my Wi-Fi goes down?
Answer: Yes, most smart locks still work manually with a key or via Bluetooth during network outages. Remote features won’t work until the connection returns.
Question: Do smart locks fit on both left-handed and right-handed doors?
Answer: Most models are reversible or include adjustable components. Always check the product manual to confirm compatibility with your door orientation.
Question: How do I know if my door is compatible with a smart lock?
Answer: Measure the borehole size (usually 2-1/8″) and backset (2-3/8″ or 2-3/4″). Also, confirm that your door thickness is within the supported range, typically 1-3/8″ to 2″.
Question: Is it safe to use smart locks on exterior doors?
Answer: Absolutely. Reputable smart locks are tested for weather resistance and durability. Make sure you choose a model rated for outdoor use and high security.